
Before & After: Kitchen Makeover
Our biggest priority for The Treehouse was to install a new kitchen. This would be the first time both myself and my parents had ever tackled a project so big! But we had faith and determination and a tight budget that helped us pull it off ourselves.

March 2021

Listing Photo from Nov 2020

Listing Photo from Nov 2020
Step 1 was to determine what we needed. Creating lists is literally one of my favorite things to do as a Virgo Sun, and this was my time to shine. I started compiling a list of all of the elements in the room, what we would need to get new, what we would keep, and what we could salvage. I started budgeting out all of the new stuff we would need, as well as getting familiar with the costs of various different materials to start prioritizing where money would go. We did not have a firm budget but as long as we stayed under $10k I saw that as an achievement!
After spending a lot of time on Pinterest and getting some inspiration, I started to create some 3d renderings to really start putting my mind to work. I’m a visual person, so being able to plan it out was imperative to my decision making. Because our kitchen was open to our dining and living rooms, it was integral to me that I figure how these rooms will flow together. I essentially designed all three at once, but the main focus was the kitchen as this was the most important room to me at the time.

3D Rendering

3D Rendering

Most of the cabinets gone!
With my 3d renderings and mood board coming together, I started to utilize this project plan template by Exurb Co. — it helped keep everything in order and made the project feel easily executable. I was able to create shopping lists and strategize what order each task needed to happen in. Once that was in good shape, and we had actually closed on the house, we were ready to start executing the plan!
Because of the stock shortage of building supplies, we ordered a few things ahead of time: appliances (we had a few on back-order), butcherblock countertops, and the sink. My initial plan was to refinish the cabinets. We weren’t planning to change the layout much, but as we got in there, they were a mess. The time and labor it would take on our end to refinish them didn’t compare to the fair cost of new cabinets we could get at Home Depot. So, we popped over there to see what was in stock, and somehow, we were able to get all of the cabinets we needed on the spot! It felt like it was meant to be, truly.
We tore out the old counters and cabinets, evened out the walls and filled in holes with spackling, and then first thing to do was paint! With the interesting ceiling lines we had and the plan to open up the wall by removing some cabinets and having open shelving, I wanted something bright, but comfortable. We went with this warm yellow called Honeycomb (SW6375) from Sherwin Williams, and within the first day of painting, seeing how it changed colors throughout the day depending on the light, I was so supremely happy with the choice!!

Momma the master painter

Afternoon light
Following painting, we started installing the lower cabinets and staining the countertops. We also updated the outlets to GFCI (very important!)
After the lower cabinets were in, we started installing the countertops. An important part in that step was to measure out and cut the hole for the sink — there’s very little room for error there!! 😬 Counters were in, now it was time to install the sink. We thought this would be a fairly straight-forward process, but of course my crazy butt had to get a right-sided draining sink which proved to be an absolute nightmare to find the right plumbing for. After multiple trips to Lowes and Home Depot and 7 hours, we FINALLY were able to piece it together and get it working. Finally having a sink in place was so exciting because we were finally on our way to a functional kitchen!

Staining our butcher block countertops out on the deck

Countertops in

The final product of the sink saga
Once the countertops and sink were in, we started moving appliances into place, and installing the cabinet knobs and drawer pulls. Upper cabinets got installed fairly quickly... and we were almost done! Final touches of the butcher block backsplash and kick-boards were installed, along with our electrician coming in and installing our new range.


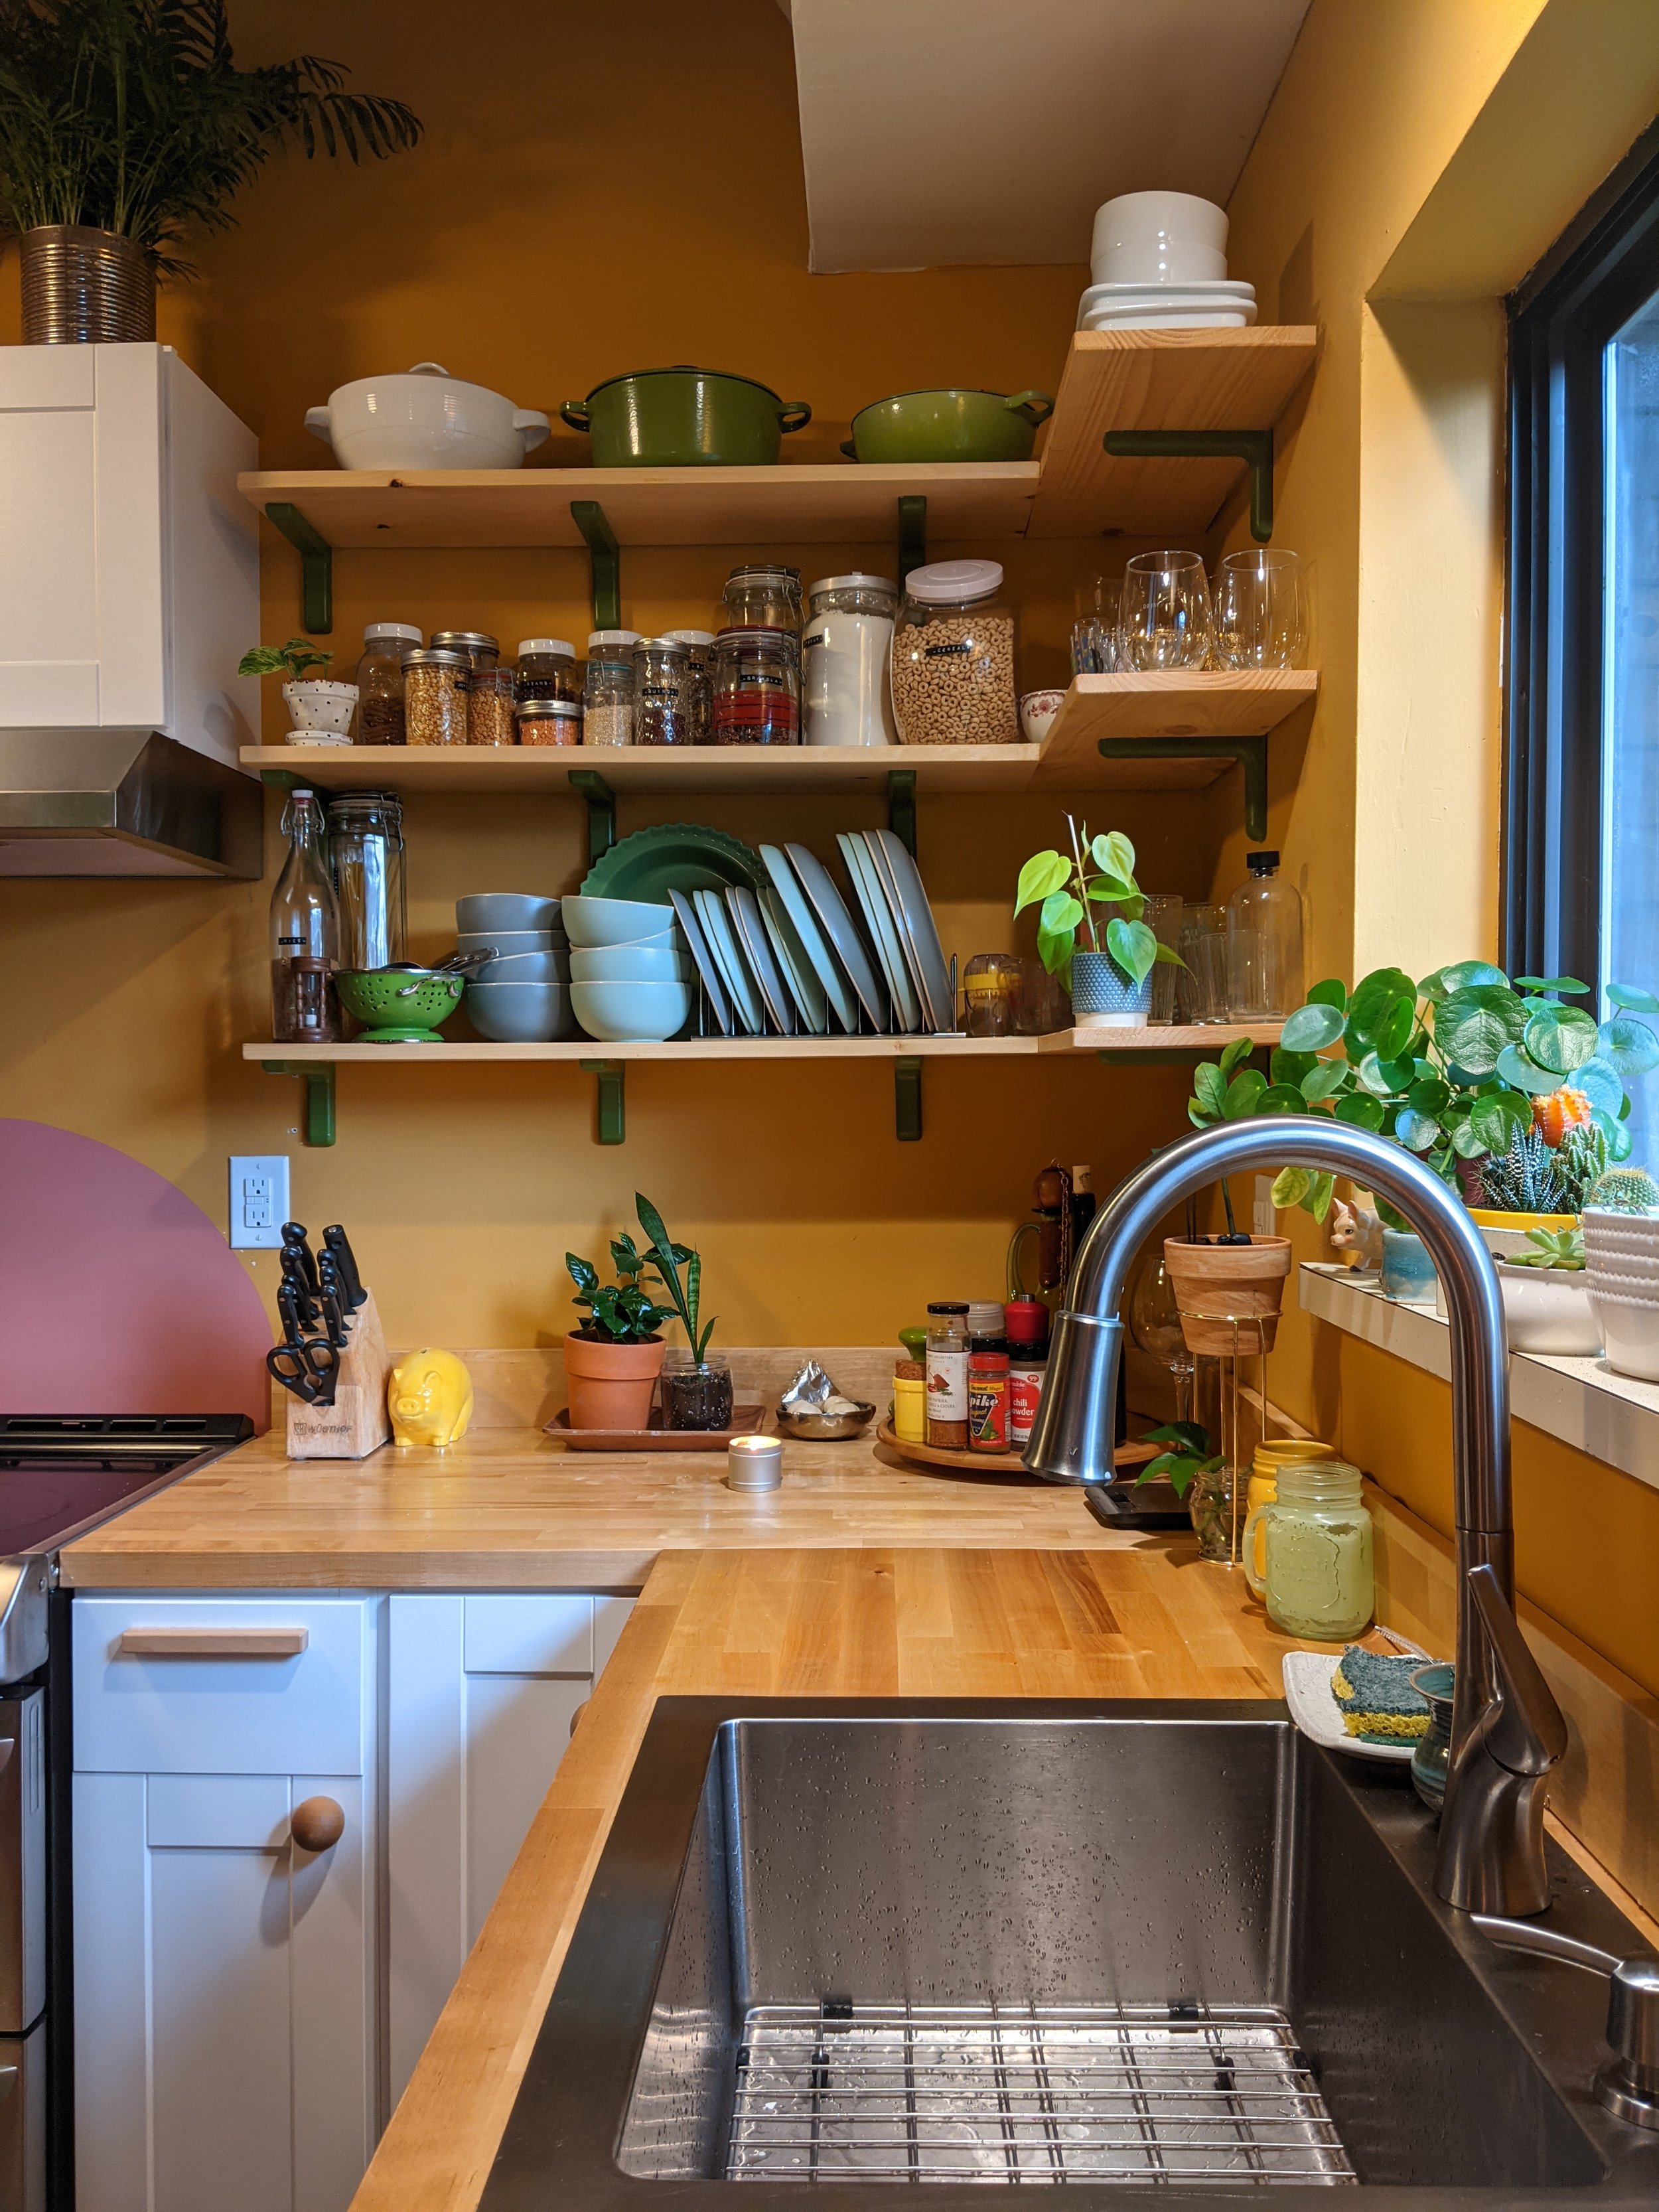
The last big project of the kitchen were the custom open shelves. After a lot of measuring, calculating, researching, and planning, I found the studs and got them up within a few days! They were treated with the same oil as the countertops, and I painted the brackets with a lovely avocado green to pop out against the warm yellow wall. I knew there would be tons of plants and I have some green Le Creuset dishware I would display on the open shelving, so I knew it would tie it all together. We eventually plan to have a lovely tile backsplash, as planned out in the 3d rendering, but we decided to put that on the backburner. It still needed something above the range, so I went with a sweet little custom-mixed pink semi-circle that just capped off the playfulness of the room.


And with that, we added all of our dishes and kitchen supplies, plants filled the windowsill, open ceiling and counters, and our dream kitchen was COMPLETE! It was such an adventure, lots of frustrating moments (I repeat, do not get a side draining sink!!!) but I cannot thank my parents enough for being such champions and believing in my vision and trusting my ideas. Continue below for budget breakdown and links to products & project plan.


The Project Plan can be viewed here
Product Links & Cost Breakdown ($USD):
Appliances: $5700 [Refrigerator, Range, Range Hood, Dishwasher, Microwave]
Cabinetry: $1285; Drawer Pulls & Knobs: $72
Countertops: Butcherblock: $730; Backsplash: $120; Stain: $35
Paint: Main Color: $70; Supplies: $15; Shelf bracket paint: $5; Mural paint was custom mix
Shelving: Brackets: $85; Wood: $100;
Misc: Range hookup: $30; Water line fitting: $5; Sink: $280; Plumbing: $20; Chairs: $75 on FBMP; GFCI Outlets & Switch plates: $65; Hardware: $20
All-In Cost: $8700
Time to Complete: 4 Weeks (on and off)